
The Doc Browser helps you upload, preview, and organize documents within a Case. Whether you're dragging and dropping files or linking documents directly to Events, this guide walks you through each method to help your team stay organized and efficient.
🧭 The Doc Browser
The Doc Browser is accessible from the Documents tab inside any Case. It allows you to manage all case-related documents in one place.
📘Learn more about the Doc Browser
With the Doc Browser you can:
✅ Upload documents directly to a Case
✅ Drag and drop files from your desktop
✅ Add documents to specific Events
✅ Upload multiple documents at once
✅ Scan documents for dates to assist with organization
💡 Tip: You can also right-click any Event on the Case Timeline and select “Add a Document” to upload directly to that Event.
💡 Best Practice
Important: Before uploading a document, make sure it is fully closed on your computer.
If a document is open, or being actively synced, you may see a “Document not found” or “File in use” error during upload.
🤔 Why does this happen?
Modern computers automatically sync files to cloud services like OneDrive. When a document is saved inside a synced folder and is currently open (for example, in Word), your operating system temporarily locks the file to prevent data conflicts.
In those cases, other applications, like Casefriend, can’t reliably access the file.
You’ve probably seen a message like this before when trying to move or modify an open document:
“The action can’t be completed because the file is open in Word.”
✅ Best practice
Before uploading:
- Save your document
- Close it completely
- Then upload it to Doc Browser
Once the file is closed, the upload should proceed without issue.
📝 Uploading Documents
🖱️Drag and Drop Files
1️⃣ Drag documents from your computer into the Doc Browser
2️⃣ Complete the Document upload form
🚚 Move Documents
1️⃣ Grab the left edge of a document with your mouse and drag to a Category
2️⃣ Select the appropriate Event type
📅 Add a Document to an Event
1️⃣ Drag documents from your computer into the Event Documents tab
2️⃣ Complete the Document upload form
🖱️ Upload Documents from the Timeline
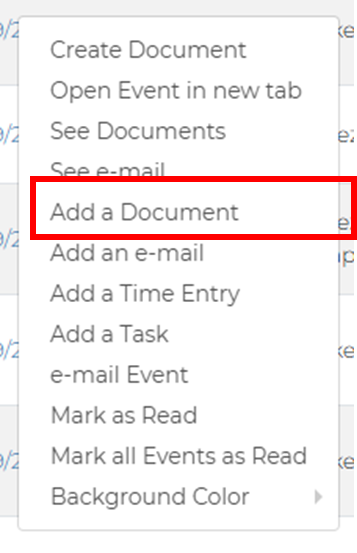
1️⃣ Right-click and Event on the TimelineUse the right-click menu from the Timeline to upload documents
2️⃣ Select Add a Document
3️⃣ Select the documents to upload from your computer & complete the Document upload form
📁 Manually Upload Documents
Prefer not to drag and drop? Use the Upload button in the Doc Browser ribbon to select documents from your computer.
1️⃣ Click the Upload button
2️⃣ Choose a document from your computer
3️⃣ complete the Document upload form
Mini Doc Browser
❓When to Use: When you want to see all documents associated with a specific Event on the Timeline
What It Does: Displays a list of documents for you to review and preview.
Best Practices
✅ Drag & Drop for speedy uploads
✅ Use the Right Click Menu
✅ Click the preview icon to preview a document without uploading
💬 Need Help?
If you have questions or need assistance, reach out to support@casefriend.com or explore more articles in the Casefriend Basics section.
Comments
0 comments
Please sign in to leave a comment.